
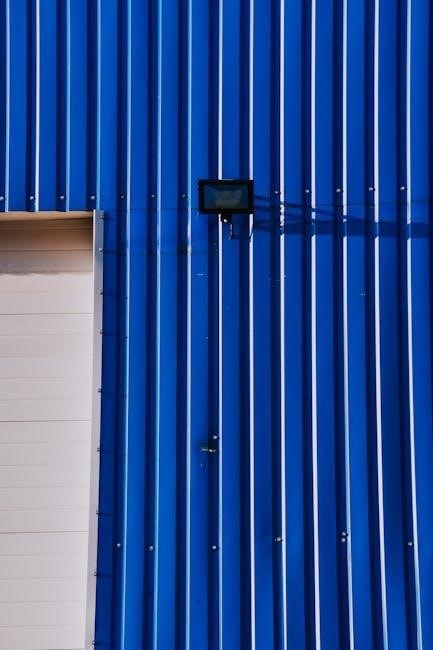
Vertical metal siding is a durable, low-maintenance option for exterior walls, offering a sleek, modern aesthetic. It is fire-resistant, eco-friendly, and suitable for both residential and commercial projects.
Preparation for Installation
Preparation for vertical metal siding installation ensures a smooth process. It involves inspecting the wall surface for damage, cleaning thoroughly, and ensuring proper framing and sheathing are in place. Address any existing issues beforehand for a secure and even installation.
Tools and Materials Needed
For vertical metal siding installation, you will need specific tools and materials. Essential tools include a measuring tape, chalk line, power saw, drill, metal snips, and screwdrivers. Materials required are metal siding panels, furring strips, fasteners, weatherproofing Flashing, and sealants. Additional items like safety gear, ladders, and storage for panels are also necessary. Ensure all tools are in good condition, and materials are compatible with your siding type for a successful installation.
Site Preparation Steps
Before installing vertical metal siding, ensure the site is clear of debris and obstructions. Inspect the wall surface for structural integrity and address any damage. Remove any existing siding or materials that could interfere with installation. Verify that electrical and plumbing components are safely accessible. Mark the area for installation boundaries and ensure proper drainage around the site. Finally, organize tools and materials to streamline the installation process and minimize delays;
Measuring and Planning the Project
Accurately measure the wall dimensions to determine the number of panels and trim required. Calculate the total material needed, considering overlaps and waste. Plan the layout to ensure proper alignment and spacing of fasteners. Identify the starting point for installation, typically from the bottom up. Create a detailed diagram or sketch to visualize the project. This step ensures efficiency and minimizes errors during the installation process, saving time and resources. Proper planning is key to a successful outcome.

Surface Preparation
Ensure the wall surface is smooth, clean, and free from damage. Inspect for cracks, repair them, and confirm proper framing and sheathing are intact before proceeding.
Inspecting the Wall Surface for Damage
A thorough inspection of the wall surface is critical before installing vertical metal siding. Check for cracks, gaps, or rot that could compromise the structural integrity. Look for signs of pest damage or water infiltration, which may require repairs. Ensure the surface is smooth and even, addressing any uneven areas to prevent installation issues. Any damage must be repaired to create a stable base for the siding, ensuring long-term durability and weather resistance. Neglecting this step could lead to future problems.
Cleaning the Surface
Cleaning the wall surface is essential before installing vertical metal siding. Use a pressure washer to remove dirt, grime, mildew, and grease. For tough stains, apply a mild detergent with a stiff brush, then rinse thoroughly. Avoid harsh chemicals that might damage the surface. Ensure the wall is completely dry before proceeding, as moisture can hinder proper adhesion. A clean surface ensures a secure and durable installation, preventing future issues like peeling or uneven siding alignment. This step is crucial for long-lasting results.
Ensuring Proper Wall Framing and Sheathing
Proper wall framing and sheathing are critical before installing vertical metal siding. Ensure the wall structure is sturdy, with framing spaced no more than 24 inches apart. Sheathing must be securely attached, providing a solid base for siding installation. Check for any gaps or weaknesses and reinforce them. A well-prepared wall ensures the siding adheres properly, preventing future issues like warping or loosening. This step guarantees a stable foundation for your vertical metal siding project, ensuring durability and structural integrity over time.
Material Selection
Choosing the right materials is essential for vertical metal siding. Consider factors like cost, durability, and climate considerations. Select gauge and type based on your project needs.
Choosing the Right Gauge for Your Siding
Selecting the appropriate metal gauge for vertical siding is crucial. Thicker gauges, like 22 or 24, offer greater durability and resistance to weathering, making them ideal for harsh climates. Thinner gauges, such as 26 or 28, are lighter and more cost-effective, suitable for milder conditions. Always consider local building codes and the structure’s requirements when deciding the gauge to ensure optimal performance and longevity of your siding.
Types of Metal Siding Available
Vertical metal siding comes in various styles and materials. Galvanized steel and aluminum are popular choices for their durability and corrosion resistance. Corrugated siding offers a textured, rustic look, while ribbed panels provide strength and modern aesthetics. Standing-seam siding is another option, featuring raised seams for a sleek appearance. Each type caters to different design preferences and structural needs, ensuring a tailored solution for any building project.
Installation Methods
Vertical metal siding can be installed using exposed or concealed fasteners. Exposed fasteners are simpler and cost-effective, while concealed systems offer a sleek, seamless appearance.
Exposed Fastener System
The exposed fastener system involves attaching metal siding panels directly to the wall using visible screws or nails. This method is cost-effective and simpler to install, making it a popular choice for many projects. The fasteners are drilled through the panels and into the framing, ensuring a secure hold. However, the visible fasteners may not appeal to everyone aesthetically. Proper installation ensures durability and weather resistance, but it requires precise alignment to avoid leaks or structural issues.
Concealed Fastener System
The concealed fastener system is a method where fasteners are hidden, offering a sleek appearance. It uses clips or channels to secure panels without visible screws, enhancing aesthetics and weather resistance. Ideal for modern designs, it’s popular in both residential and commercial settings. While more complex to install, it provides a uniform look and protects fasteners from the elements. However, it may be more costly and challenging to repair due to inaccessible fasteners, requiring specialized tools for maintenance and panel replacement.
Components Installation
Components like furring strips, starter strips, and flashing are essential for a secure and weather-tight installation. Each part ensures proper alignment, structural integrity, and moisture protection. Correct installation is crucial for durability and performance.
Installing Furring Strips
Furring strips are horizontal or vertical framing components installed over the exterior wall surface. They provide a flat, even base for metal siding. Typically made of wood or metal, these strips are spaced evenly to ensure proper drainage and ventilation. Secure them with corrosion-resistant fasteners, pre-drilling holes to prevent splitting. Proper alignment and leveling are crucial for a smooth siding installation. Ensure strips are spaced according to the manufacturer’s recommendations for optimal performance and durability.
Adding the Starter Strip
The starter strip is a crucial component that initiates the siding installation process. Typically installed at the bottom or starting edge of the wall, it provides a secure base for the first panel. Ensure the strip is aligned with the furring strips and fastened using compatible screws. Proper alignment is essential to maintain the structural integrity and visual appeal of the siding. Once installed, the starter strip supports the panels, ensuring a seamless and weather-tight installation. Always verify the strip is level before proceeding.
Applying Flashing for Weatherproofing
Flashing is essential for ensuring a weather-tight seal around vulnerable areas such as windows, doors, and roof lines. Cut the flashing material to size using PVC or metal, and secure it with fasteners or adhesive. Apply it beneath the siding panels, overlapping seams by at least 6 inches. Seal all intersections and edges with a compatible sealant to prevent water infiltration. Proper flashing installation is critical for maintaining the durability and structural integrity of the metal siding system.
Panel Installation
Begin by aligning the first panel with the starter strip, ensuring it is level and plumb. Secure the panel with fasteners, starting from the bottom and working upward. Each subsequent panel should fit snugly into the previous one, maintaining proper alignment. Use a rubber mallet to tap panels into place if necessary. Always follow the manufacturer’s instructions for spacing and fastening to ensure a secure and weather-tight installation.
Handling and Cutting Panels
Handle metal panels with care to avoid scratching or bending. Always wear gloves and safety glasses when cutting. Use a carbide-tipped saw or metal-cutting blade for clean cuts. Pre-drill holes for fasteners to prevent deformation. Measure panels accurately, ensuring proper fit for each section. Cut panels in a well-ventilated area, away from open flames. Store panels upright and protected from weather. Avoid using abrasive materials that could damage the finish. Follow manufacturer guidelines for cutting tools and techniques to maintain panel integrity and warranty.
Aligning Panels Correctly
Proper alignment of vertical metal siding panels is crucial for a professional finish and functionality. Start by ensuring the first panel is level and plumb, as this sets the foundation for the entire installation. Use a chalk line to mark straight lines across the wall, guiding panel placement. Align each panel with the studs for secure fastening. Check each panel’s position before securing it to avoid misalignment. Proper alignment ensures weather-tight seals, even appearance, and structural integrity, preventing future issues like water infiltration or uneven wear.
Fasteners
Fasteners for vertical metal siding must be durable and weather-resistant, such as galvanized or stainless steel. They should be spaced evenly and driven into solid wood framing for stability.
Choosing the Right Fasteners
Choosing the right fasteners is crucial for a secure and durable vertical metal siding installation. Use galvanized or stainless steel fasteners to ensure rust resistance and longevity. Select fasteners that are compatible with your siding material and local weather conditions. Ensure they are long enough to penetrate the sheathing and framing, typically at least 1.5 inches. Proper fasteners prevent loosening over time and maintain the structural integrity of the siding system. Always pre-drill holes to avoid damaging the panels.
Spacing Fasteners Correctly
Spacing fasteners correctly ensures a secure and visually appealing vertical metal siding installation. Fasteners should be spaced every 12-18 inches vertically and 16-24 inches horizontally, depending on the panel size and local building codes. Ensure fasteners are 1.5 inches away from panel edges and 3 inches from corners to prevent warping. Proper spacing prevents panels from loosening over time and maintains the structural integrity of the siding system. Follow manufacturer guidelines for optimal results.
Sealing Gaps and Joints
Sealing gaps and joints is crucial for ensuring weatherproofing and structural integrity in vertical metal siding. Use high-quality sealants like silicone or polyurethane-based products to fill gaps between panels, edges, and fasteners. Apply sealants around windows, doors, and any openings to prevent water infiltration. Flashing should be installed at joints, especially where panels meet at corners or transitions. Regularly inspect and reseal gaps to maintain the siding’s performance and durability over time.

Post-Installation Steps
After installing vertical metal siding, inspect for gaps or loose fasteners. Touch up any scratches and ensure all components are securely fastened. Clean the surface to remove dirt or debris, and apply a protective coating if needed. Regular maintenance, including annual inspections and touch-ups, will extend the siding’s lifespan and maintain its appearance.
Inspecting the Installation
After completing the installation, conduct a thorough inspection to ensure all components are correctly installed. Check for any gaps, loose fasteners, or misaligned panels. Verify that flashing is properly sealed and that all joints are watertight. Inspect the entire surface for scratches or damage. Address any issues immediately to prevent future problems. This step ensures the siding performs optimally and maintains its durability and appearance over time.
Touching Up Mistakes
If mistakes are found during inspection, address them promptly. For scratches or dents, use touch-up paint matching the siding’s color. If panels are misaligned, carefully remove and re-install them. Check for loose fasteners and tighten or replace as needed. Ensure all gaps are properly sealed to maintain weatherproofing. Addressing issues early prevents costly repairs and ensures the siding’s longevity. Always follow manufacturer guidelines for touch-ups to maintain warranty validity and structural integrity.
Maintenance Tips
Regular maintenance ensures the longevity and appearance of vertical metal siding. Clean the siding periodically with mild detergent and water to remove dirt and grime. Inspect for damage, dents, or rust, and address issues promptly. Keep gutters clear to prevent water accumulation. Trim vegetation to avoid scratching the siding. Avoid using harsh chemicals or abrasive cleaners, as they can damage the finish. Perform annual inspections and touch-ups to maintain weatherproofing and structural integrity. Proper care enhances durability and preserves the siding’s aesthetic appeal.
Safety Precautions
Ensure proper safety measures during vertical metal siding installation. Wear protective gear, including gloves, safety glasses, and a dust mask. Use sturdy ladders and maintain three points of contact. Ensure the structure is stable before starting work. Handle sharp metal edges with care to avoid cuts. Avoid working in extreme weather conditions. Keep power tools well-maintained and follow manufacturer guidelines. Secure loose clothing and long hair to prevent accidents. Always follow local building codes and safety regulations for a secure installation process.
Common Mistakes to Avoid
One common mistake during vertical metal siding installation is improper measurement, leading to misaligned panels. Failing to ensure the wall surface is dry and secure can cause fasteners to loosen over time. Incorrect spacing of fasteners may result in warped or buckled panels. Ignoring the need for flashing in joints can lead to water infiltration. Cutting panels without proper tools can create rough edges, compromising both appearance and durability. Always double-check measurements and follow manufacturer guidelines to achieve a professional finish.
Installing vertical metal siding is a rewarding project that enhances your home’s curb appeal and durability. By following proper preparation, measurement, and installation steps, you can achieve professional results. Regular maintenance ensures longevity, while avoiding common mistakes prevents costly repairs. Vertical metal siding offers a modern, versatile solution for exterior walls, providing both aesthetic appeal and structural protection. With careful planning and execution, your siding project will yield lasting benefits for years to come.